The Viking stove self-cleaning feature offers a convenient and efficient way to maintain your oven’s hygiene. This advanced function uses high temperatures to turn food residue into ash, simplifying cleanup. It’s designed to save time and effort while ensuring a spotless cooking environment. Regular use of this feature helps maintain your stove’s performance and aesthetic appeal, making it a practical solution for home cooks and professional chefs alike.
1.1 Overview of Self-Cleaning Feature
The Viking stove’s self-cleaning feature utilizes high heat to convert food residue into ash, simplifying cleanup. It’s a time-saving solution that maintains oven hygiene without harsh chemicals. Proper preparation, like removing racks and wiping spillovers, ensures optimal results. This feature is designed for efficiency and convenience, making it a valuable tool for maintaining your appliance’s performance and appearance.
1.2 Benefits of Using the Self-Clean Function
Using the self-clean function on your Viking stove offers multiple benefits. It eliminates tough food residue effortlessly, reduces the need for harsh chemicals, and maintains the oven’s interior. Regular use prevents grease buildup, ensuring optimal performance and a cleaner cooking environment. This feature also extends the lifespan of your appliance, making it a practical and efficient cleaning solution.
Preparing Your Viking Stove for Self-Cleaning
Before initiating the self-clean cycle, ensure your Viking stove is properly prepared. Remove racks, utensils, and wipe down excessive spillover to prevent smoke and flare-ups during cleaning. This step ensures a smooth and effective cleaning process.
2.1 Removing Oven Racks and Utensils
Remove all oven racks, broiler pans, and utensils before starting the self-clean cycle. This prevents damage from high heat and ensures thorough cleaning. Store items safely to avoid accidental interference during the process. Clean racks separately with mild soap and water for optimal maintenance. This step is crucial for effective self-cleaning operation.
2.2 Wipe Down Excessive Food Spillover
Before initiating the self-clean cycle, wipe down excessive food spillover using a damp cloth or paper towel. This prevents smoke and flare-ups during high-temperature cleaning. Avoid using harsh chemicals, as they may damage the oven’s finish. Focus on heavy buildup areas to ensure the self-clean process is effective and safe. This step prepares the oven for optimal cleaning results.
2.3 Ensuring the Oven is Cool Before Starting
Always ensure the oven is completely cool before starting the self-clean cycle. A hot oven can cause damage or interfere with the cleaning process. Allow the oven to cool for at least 2 hours after last use. This step ensures safety and prevents any potential issues during the high-temperature cleaning phase. Cooling is essential for effective and safe self-cleaning.
Safety Precautions Before Starting the Self-Clean Cycle
Ensure proper ventilation, avoid using oven cleaners, and keep children away. These precautions prevent hazards and ensure a safe self-cleaning process. Always follow guidelines carefully.
3.1 Ventilation Requirements
Proper ventilation is essential during the self-cleaning cycle to eliminate fumes and odors. Open windows and ensure good airflow in the kitchen. This helps prevent the buildup of harmful gases and ensures a safe environment while the oven cleans. Always maintain adequate ventilation to avoid any potential health risks.
3.2 Avoiding Oven Cleaners
Never use chemical oven cleaners during or after the self-cleaning cycle, as they can damage the oven’s finish or harm its components. The high heat of the self-clean function is designed to eliminate food residue without chemicals. Using cleaners can leave harmful residues and void the warranty. Always rely on the self-cleaning process for safe and effective results.
3.4 Preventing Children from Interfering
Ensure children stay away during the self-cleaning cycle, as the oven door locks and extreme heat can cause burns. Keep kids out of the kitchen to prevent accidental interference. Supervise children and educate them about the dangers of touching the hot stove or attempting to open the locked oven door during the cleaning process.
Initiating the Self-Cleaning Cycle
Initiating the self-cleaning cycle involves setting the oven to self-clean mode, selecting the desired temperature, and ensuring the door locks securely for safety and effective cleaning.
4.1 Setting the Oven to Self-Clean Mode
To begin, close the oven door completely and turn the oven selector knob clockwise to the self-clean mode. Next, set the temperature control knob past the clean setting to activate the cycle. Ensure the door is locked securely for safety and efficiency during the cleaning process. The oven will remain locked until it cools down after completion.
4.2 Selecting the Correct Temperature
Select the self-cleaning temperature by turning the temperature control knob to the designated clean setting, typically marked at 850°F. Confirm the selection by pressing the appropriate button or following the sequence outlined in your Viking stove’s manual. The oven will begin the cycle once the door is locked, ensuring a safe and efficient cleaning process. The cycle will complete once the oven cools down.
4.3 Understanding the Locking Mechanism
The Viking stove’s self-cleaning locking mechanism ensures safety by securing the oven door during the high-temperature cleaning cycle. Once the cycle starts, the door automatically locks and remains locked until the oven cools down. This prevents accidental burns and ensures proper cleaning efficiency. The lock releases once the oven has cooled to a safe temperature.
During the Self-Cleaning Process
During self-cleaning, the Viking stove’s interior reaches extreme temperatures, converting food residue into ash. The process typically lasts 2-4 hours, depending on soil level. Keep the area well-ventilated to manage odors and fumes, and avoid opening the locked door until the cycle completes and the oven cools down naturally.
5.1 Expected Duration of the Cycle
The self-cleaning cycle on a Viking stove typically lasts between 2 to 4 hours, depending on the level of soil and selected temperature. The oven locks during this time, ensuring safety and efficiency. After completion, allow the oven to cool down completely before opening the door or wiping away the residue. Patience is key for optimal results and safety.
5.2 Dealing with Noise and Odors
During the self-cleaning cycle, expect some noise due to the oven’s high heat causing metal expansion. Strong odors from burning food residue are normal but can be managed by ensuring good ventilation. Open windows or use an exhaust fan to minimize fume circulation. Avoid leaving the area if odors are overwhelming, and keep the kitchen well-ventilated throughout the process for safety and comfort.
5.3 Monitoring the Process Safely
Keep a safe distance from the oven during the self-cleaning cycle, as it produces high heat. Ensure children are supervised and the oven door remains locked. Proper ventilation is crucial to prevent fume buildup. The cycle typically lasts 2-4 hours; expect noise and odors, but avoid opening the door until it cools and unlocks.

Post-Self-Cleaning Steps
After the cycle, let the oven cool completely before wiping down the interior with a damp cloth. Dispose of any food residue safely and clean surrounding surfaces thoroughly.
6.1 Allowing the Oven to Cool Down
After the self-cleaning cycle, switch off the oven and let it cool completely. This step is crucial as the oven remains extremely hot for several hours post-cycle. Opening the door too soon can release harmful fumes or cause burns. Ensure the oven is cool to the touch before proceeding with any cleaning or maintenance tasks.
6.2 Wiping Down the Oven Interior
Once the oven has cooled, use a soft, damp cloth to wipe down the interior surfaces. This removes ash and residue left after the self-cleaning cycle. Avoid using abrasive materials or harsh chemicals, as they may damage the finish. Ensure all areas are cleaned thoroughly for a spotless finish and optimal hygiene.
6.3 Disposing of Food Residue Safely
After the self-cleaning cycle, carefully sweep out ash and food residue using a soft brush. Dispose of the debris in a sealed container or garbage bin to prevent dust dispersal. Avoid pouring ash down drains to prevent clogs. For eco-friendly disposal, mix with water to create a harmless paste before discarding.

Maintenance Tips After Self-Cleaning
Regularly wipe down surfaces, check for leftover particles, and schedule routine cleans to maintain your Viking stove’s efficiency and appearance. Consistent upkeep ensures optimal performance and longevity.
7.1 Regular Wipe Downs
After self-cleaning, use a damp cloth to wipe down the oven interior, removing any ash or residue. For exterior surfaces, apply a stainless steel cleaner to maintain shine and prevent fingerprints. Regular wipe downs prevent grime buildup, ensuring your Viking stove remains clean and functional. This simple step enhances both appearance and performance over time.
7.2 Checking for Remaining Food Particles
After the self-cleaning cycle, inspect the oven for any leftover food particles. Use a damp cloth or soft brush to remove residual ash or debris. This ensures the oven remains clean and functional, preventing future buildup. Regular checks help maintain efficiency and prevent unpleasant odors during cooking. Consistency is key to optimal performance and hygiene.
7.3 Scheduling Routine Cleans
Regularly scheduling self-cleaning cycles ensures your Viking stove remains in optimal condition. Depending on usage, clean every 1-3 months to prevent grime buildup. Plan cleans during low-usage times, like weekends, to avoid disrupting cooking routines. Consistency maintains the oven’s efficiency and prevents stubborn food residue from accumulating, making future cleans easier and more effective.
Troubleshooting Common Issues
Common issues during self-cleaning include oven doors not unlocking or incomplete cleaning. Consult the user manual for error codes and restart the cycle if needed.
8.1 Oven Not Unlocking
If your Viking stove’s oven fails to unlock after the self-cleaning cycle, ensure it has cooled completely. Allow it to cool overnight if necessary. Verify all controls are in the OFF position. If the issue persists, check for obstructions or consult the user manual for troubleshooting steps to resolve the locking mechanism.
8.2 Incomplete Cleaning
If the self-cleaning cycle leaves residue, ensure the oven was properly prepared. Remove racks and utensils, and wipe excessive spillover beforehand. Verify the cycle duration and temperature are set correctly for your Viking model. Incomplete cleaning may result from insufficient time, inadequate ventilation, or heavy food buildup. For tough spots, consider repeating the cycle or manually cleaning with a gentle solution. Regular maintenance can improve efficiency and prevent future issues.
8.3 Error Codes or Malfunctions
Error codes during the self-cleaning cycle indicate potential issues. Ensure the oven is completely cool and the door is properly locked. If malfunctions persist, consult the user manual or contact Viking support. Power interruptions or sensor issues may trigger errors. Resetting the oven or checking connections often resolves the problem. Always follow manufacturer guidelines for troubleshooting to avoid further complications and ensure safe operation.
Cleaning Specific Parts
Regularly clean oven racks, burner caps, and grates to maintain performance. Use stainless steel cleaners for exterior surfaces and avoid abrasive materials to prevent damage. Always rinse thoroughly after cleaning to ensure a polished finish and optimal functionality of your Viking stove.
9.1 Oven Racks and Utensils
Before initiating the self-cleaning cycle, remove all oven racks and utensils to prevent damage. Soak racks in warm, soapy water to loosen food residue. Use non-abrasive cleaners to avoid scratching surfaces. Rinse thoroughly and dry to prevent water spots. This ensures racks remain in optimal condition for future use.
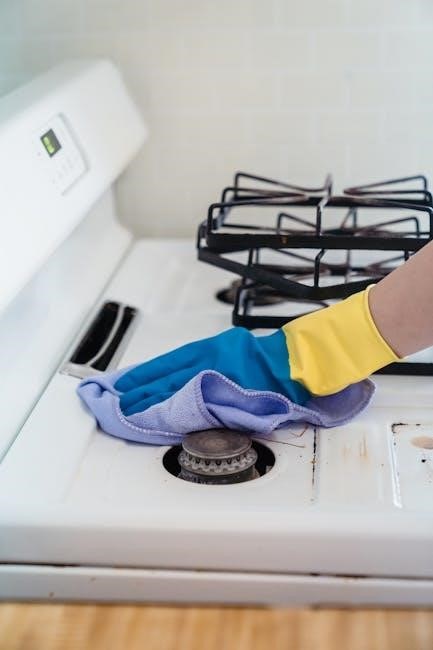
9.2 Burner Caps and Grates
Clean burner caps and grates regularly to maintain functionality. Remove them and soak in warm, soapy water to loosen grime. Use a non-abrasive cleaner or vinegar solution to scrub away residue. Avoid abrasive materials that may scratch surfaces. Rinse thoroughly and dry to prevent water spots, ensuring optimal performance and longevity of your Viking stove components.
9.3 Exterior and Stainless Steel Surfaces
For exterior and stainless steel surfaces, use a stainless steel cleaner to remove smudges and fingerprints. Rub in the direction of the grain or brushed finish for optimal appearance. Avoid abrasive materials or harsh chemicals, as they may damage the finish. Regular cleaning helps maintain the stove’s sleek look and durability over time.

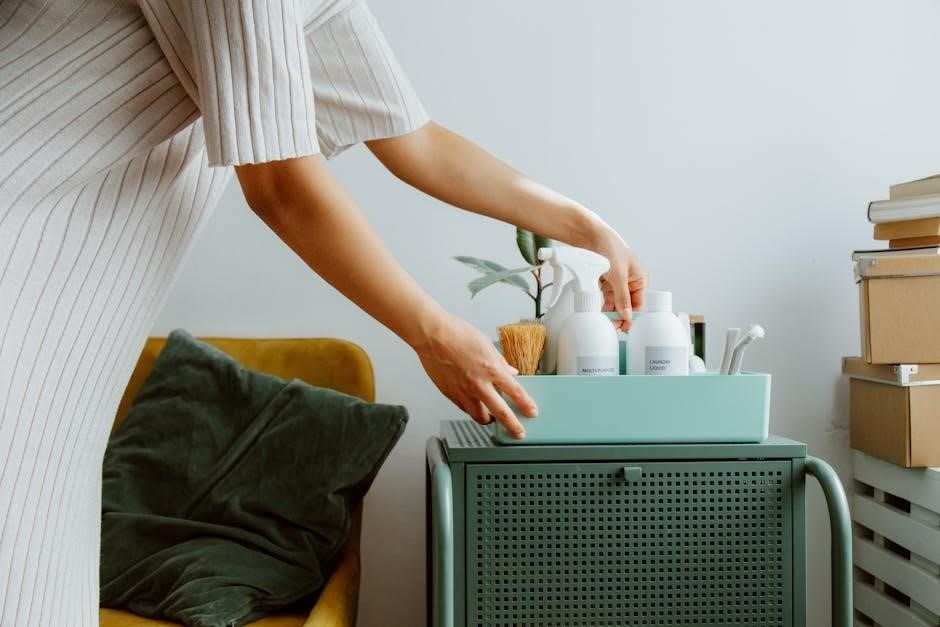
Using Cleaning Products Safely
Avoid using abrasive cleaners or harsh chemicals on your Viking stove. Instead, opt for gentle detergents or stainless steel cleaners for exterior surfaces. Always follow product instructions carefully to ensure safety and preserve the appliance’s finish. Natural solutions like vinegar and water can also be effective for light cleaning tasks.
10.1 Recommended Cleaners for Different Surfaces
For stainless steel surfaces, use a stainless steel cleaner or a mixture of equal parts water and white vinegar. Glass surfaces can be cleaned with glass cleaner or vinegar. For burner caps and grates, a non-abrasive scrubber with soap and water is effective. Avoid harsh chemicals to prevent damage and ensure longevity of your Viking stove components.
10.2 Avoiding Abrasive Materials
Avoid using abrasive materials like steel wool, scouring pads, or harsh chemicals, as they can scratch or damage your Viking stove’s surfaces. Instead, opt for soft cloths, gentle cleaners, or vinegar solutions to maintain the finish. Always spot test cleaning products on a small area first to ensure they won’t harm the material.
10.3 Natural Cleaning Solutions
Natural cleaning solutions like vinegar and water or baking soda paste are effective for Viking stoves. These eco-friendly options gently remove grime without damaging surfaces. Avoid abrasive materials and always test a small area first. For tougher stains, mix equal parts water and white vinegar in a spray bottle and wipe clean with a soft cloth.
The Viking stove’s self-cleaning feature is a valuable tool for maintaining a pristine cooking environment. It simplifies oven maintenance and ensures your stove remains in prime condition.
11.1 Summary of Key Steps
For effective self-cleaning, remove oven racks and utensils, wipe down excessive spills, and ensure the oven is cool. Set the mode, monitor the process, and let it cool post-cycle. Safely dispose of food residue and wipe the interior for a spotless finish. Regular maintenance ensures optimal performance and longevity of your Viking stove.
11.2 Importance of Regular Maintenance
Regular maintenance ensures your Viking stove operates efficiently and safely. It prevents grease buildup, reduces unpleasant odors, and maintains the appliance’s appearance. Consistent upkeep also extends the stove’s lifespan and prevents costly repairs. By following a routine cleaning schedule, you preserve performance and keep your kitchen environment clean and hygienic for years to come.